How To Create A Node In Drupal 8 Using RESTful Web Services
RESTful Web Services is an incredibly powerful web tool that enables external resources to interact with applications. With the introduction of Drupal 8, RESTful Web Services was integrated in the Drupal core. This enables Drupal to be extremely flexible and opens up a host of possibilities. In this tutorial, I will introduce you to the web services of Drupal using RESTful Web Services to create a node in Drupal.
Using RESTful Web Services, you can create a node in Drupal 8 in 5 simple steps:
- Enable Modules
- Set Permissions
- Get token
- Create node
- Verify the Rest API call
Enable Modules
Get started by enabling the following 4 core modules in Drupal:
- HAL
- HTTP Basic Authentication
- RESTful Web Services
- Serialization
I will also be downloading the Rest UI module for Drupal 8. This allows easy settings of permissions and settings for the Restful services through a GUI, instead of going through the rest.settings.yml file.

Set Permissions
Next, create a new authenticated user for your site. This way you’ll learn about the kind of permissions that should be set. Alternatively, if you were to be logged in as an admin, you would automatically have all the permissions.
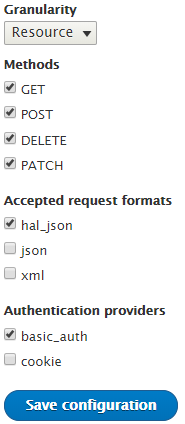
So, go ahead and create a new user. Once done, go to admin/configuration/web services/REST. Here you can enable permissions for every type of resource on your Drupal site. For now, since we’re only concerned with creating content through the RESTful Web Services, go ahead and click edit for the content row and set the following permissions:

Next, we need to set the proper permissions for authenticated users to be able to create, edit and delete content. Go to admin/people/permissions and set the following permissions:
- Basic Page: Create new content
- Basic Page: Delete own content
- Basic Page: Edit own content

Get Token
We are now ready to use REST to create a new node (page content type) in our Drupal site. Note that I will be using the excellent Restlet Client – Rest API Testing extension for chrome to test the API calls in this post. You can use whichever method you prefer.
Before we start creating a node for our site, we will have to get the token for our user in order to pass authentication. Do this by logging out of your site as an admin and logging in as the new authenticated user that we created in the last step. Now copy the URL of your site and paste it in the URL field of the Restlet Client, adding rest/session/token at the end of it. Select the ‘GET’ method from the dropdown and click send to get the token from the body field.

Create Node
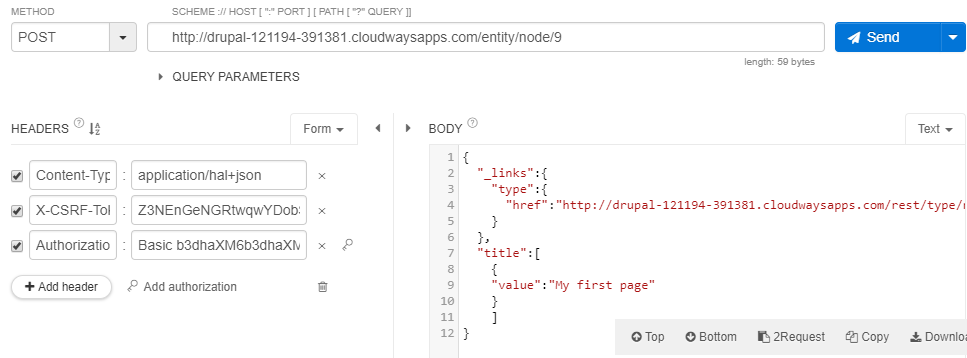
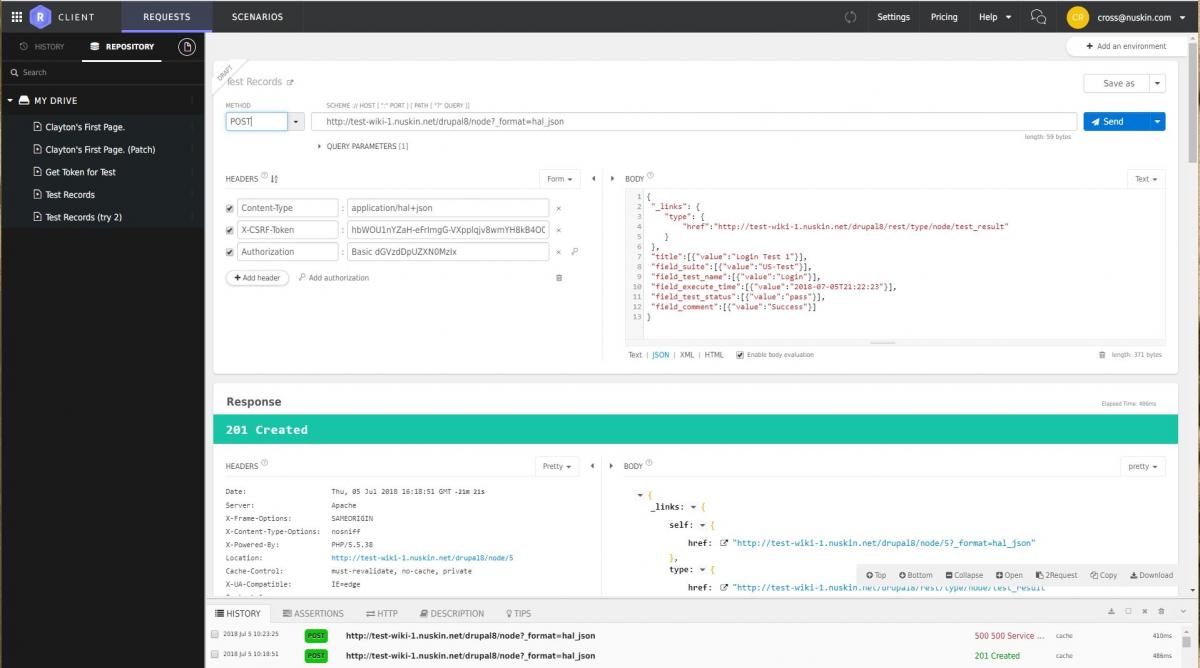
Now that we have the unique token for our user, we can get started with creating a node for our Drupal site using RESTful Web Services. We will be using the POST method to POST to entity/node, setting the Content-Type to application/hal+json. In the body field, we must declare the required title and type fields in the following way:
{
"_links": {
"type": {
"href":"http://test-wiki-1.nuskin.net/drupal8/rest/type/node/test_result"
}
},
"title":[{"value":"Login Test 1"}],
"field_suite":[{"value":"US-Test"}],
"field_test_name":[{"value":"Login"}],
"field_execute_time":[{"value":"2018-07-05T21:22:23"}],
"field_test_status":[{"value":"pass"}],
"field_comment":[{"value":"Success"}]
}
We will have to add the following headers for this call:
- Content-Type : application/hal+json
- X-CSRF-Token : ‘The token that we got from the previous step’
To add authentication, click add authorization and enter the credentials of the user that we created earlier.

Here’s what it looks like:

Click send and you should receive the 201 created response.
Verify Rest API Call
Now go to your Drupal site and navigate to admin/content. Your API call works perfectly if you see a new node created with the Title that you gave in your API call.

Conclusion
That’s it! You’ve successfully created your very own Drupal node by using the RESTful Web Services of Drupal. In this tutorial, we used the POST method. You can use the same procedure to GET, POST, PATCH and DELETE nodes in Drupal as well. Hope you found this guide useful. If you face any issues, leave me a comment and I’ll get back to you.

Images


