Reverse SSH Tunneling with Raspberry Pi zero
This is a classic "Phone Home" design. Because the NAT firewall blocks incoming connections to your Raspberry Pi, the Pi must be the one to initiate the conversation.
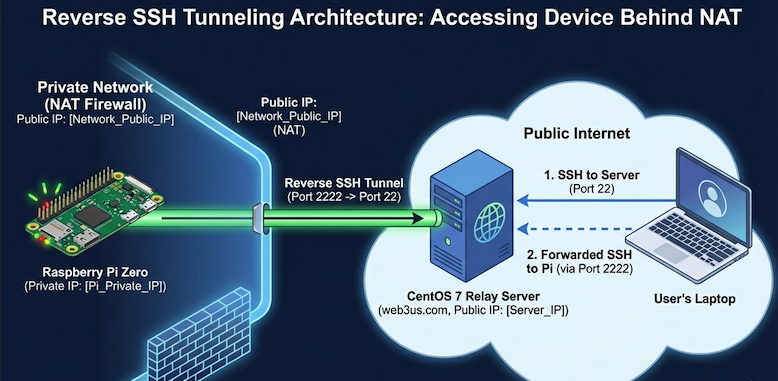
The Design Overview: Reverse SSH Tunneling
Think of this like a two-way bridge.
-
The Raspberry Pi (the client) initiates an outgoing connection to
web3us.com(the relay). -
Within that connection, the Pi tells the CentOS server: "Any traffic you receive on your local Port 2222, please forward it back through this tunnel to my Port 22."
-
When you want to access the Pi, you SSH into
web3us.comand then SSH into that "forwarded" port.
Step 1: Set up Passwordless Login (Pi to CentOS)
For a tunnel to stay up automatically, the Pi must be able to log into your CentOS server without you typing a password every time.
On your Raspberry Pi Zero:
-
Generate a key pair:
ssh-keygen -t ed25519(Press Enter for all prompts to leave the passphrase empty).
-
Copy the key to the CentOS server:
ssh-copy-id -p [Your_CentOS_SSH_Port] your_user@web3us.comReplace
[Your_CentOS_SSH_Port]with your actual SSH port (usually 22) andyour_userwith your username on the CentOS box.
Step 2: Configure the CentOS Server (web3us.com)
By default, CentOS might limit how these tunnels behave. We want to ensure the server keeps the connection alive.
On your CentOS 7 server:
-
Edit the SSH configuration:
sudo vi /etc/ssh/sshd_config -
Ensure these lines are present and not commented out:
-
GatewayPorts yes(Allows you to connect from outside directly, optional but helpful). -
TCPKeepAlive yes -
ClientAliveInterval 60(Server will check if the Pi is still there every 60 seconds).
-
-
Restart SSH:
sudo systemctl restart sshd
Step 3: Establish the Tunnel (On the Pi Zero)
Since the Pi Zero can be a bit finicky with Wi-Fi, we will use autossh. It is much better than a standard ssh command because it will automatically restart the tunnel if the connection drops.
-
Install it:
sudo apt update && sudo apt install autossh -y -
Run the tunnel command:
autossh -M 0 -f -N -o "ServerAliveInterval 30" -o "ServerAliveCountMax 3" -R 2222:localhost:22 your_user@web3us.comBreakdown of the flags:
-
-M 0: Disables autossh's internal monitoring (we use SSH's built-in monitoring instead). -
-f: Runs the tunnel in the background. -
-N: Tells SSH not to execute any remote commands (just keep the pipe open). -
-R 2222:localhost:22: The magic part. It maps Port 2222 on the CentOS server back to Port 22 on the Pi.
-
Step 4: How to Use the Tunnel
Now that the Pi has "held the door open," here is how you walk through it from your laptop.
Option A: The Two-Step (Safest)
-
SSH into your CentOS server:
ssh your_user@web3us.com -
Once inside CentOS, SSH into the Pi:
ssh pi@localhost -p 2222
Option B: The One-Step Jump (Fastest)
From your laptop terminal, run:
ssh -J your_user@web3us.com pi@localhost -p 2222
This uses the CentOS server as a "jump host" and takes you straight to the Pi prompt.
Step 5: Make it Permanent
To ensure the Pi starts this tunnel every time it boots up, add the autossh command to your crontab.
-
On the Pi:
crontab -e -
Add this line at the very bottom:
@reboot autossh -M 0 -f -N -o "ServerAliveInterval 30" -o "ServerAliveCountMax 3"