How To Configure Varnish Cache with Apache Reverse Proxy and SSL Termination
Based on site: PlumRocket
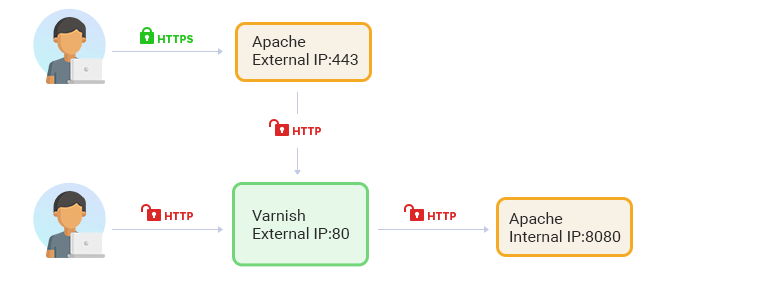
In this guide, we will show you how to install and configure the Varnish cache for the Apache webserver with SSL termination. One limitation of Varnish Cache is that it is designed to accelerate HTTP, not the secure HTTPS protocol. Therefore, some workarounds must be performed to allow Varnish to work on SSL enabled website.
SSL/TLS Termination is the process of decrypting SSL-encrypted traffic. In our case, Apache acts like a proxy server and intermediary point between the client and Varnish and is used to convert HTTPS to HTTP.
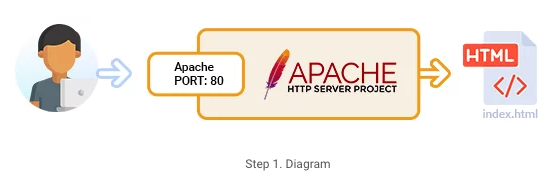
Step 1. Install and Configure Apache (Backend) on CentOS/RHEL 8
We had CentOS 8 installed on our web server, which uses dnf package manager. However, if you are familiar with Linux systems, you can apply this manual almost entirely to other OS, such as Centos 7 (use yum) or Ubuntu and Debian (use apt instead).
1. Install Apache, start it automatically at boot, and launch
sudo dnf install httpd
sudo systemctl enable httpd
sudo systemctl start httpd
sudo systemctl status httpd
2. Create a directory for your website and grant permissions
Make sure to replace the “example.com” with your domain name:
sudo mkdir -p /var/www/example.com/public_html
sudo mkdir -p /var/www/example.com/log
sudo mkdir -p /var/www/example.com/ssl
Use aux | grep httpd or ps aux | grep apache to see what user Apache is using on your system.
In our case, the Apache user is “apache” (you may see “www-data” or other username displayed), therefore we will run the following commands to grant necessary permissions:
sudo chown -R apache:apache /var/www/
sudo chmod -R 750 /var/www
3. Create a dummy index file in your domain’s document root directory
echo 'Hello, World!' > /var/www/example.com/public_html/index.html
4. Create a new virtual host file and restart Apache
sudo mkdir /etc/httpd/sites-available
sudo mkdir /etc/httpd/sites-enabled
Tell Apache to look for virtual hosts in the sites-enabled directory:
sudo vi /etc/httpd/conf/httpd.conf
Add this line at the end of httpd.conf file:
IncludeOptional sites-enabled/*.conf
Create the new virtual host file:
sudo vi /etc/httpd/sites-available/example.com.conf
<VirtualHost *:80>
    ServerName example.com
    ServerAlias www.example.com
    DocumentRoot /var/www/example.com/public_html
    ErrorLog /var/www/example.com/error.log
    CustomLog /var/www/example.com/requests.log combined
</VirtualHost>
Enable the new virtual host files
sudo ln -s /etc/httpd/sites-available/example.com.conf /etc/httpd/sites-enabled/example.com.conf
Restart Apache
sudo systemctl restart httpd
Open access to the HTTP service in the firewall
systemctl restart firewalld
systemctl enable firewalld.service
firewall-cmd --state
firewall-cmd --zone=public --permanent --add-service=http
firewall-cmd --reload
Open your domain in the web browser to see the “Hello, World!” message, e.g.:
http://example.com or http://example.com:80
Step 2. Install and Configure Varnish Cache
1. Install Varnish Cache
dnf module install varnish
Change the default Varnish Listen port from 6081 to 80.
sudo vi /etc/systemd/system/varnish.service
Find the following line:
ExecStart=/usr/sbin/varnishd -a :<strong><em>6081</em></strong> -f /etc/varnish/default.vcl -s malloc,256m
And replace it with this one:
ExecStart=/usr/sbin/varnishd -a :<strong><em>80 </em></strong>-f /etc/varnish/default.vcl -s malloc,256m
Save changes.
Check the default Varnish backend IP and port.
sudo vi /etc/varnish/default.vcl
It should look like this:
backend default {
    .host = "127.0.0.1";
    .port = "8080";
}
2. Change the default apache HTTP port 80 to 8080 (or any other port of your choice)
sudo vi /etc/httpd/conf/httpd.conf
Find the following line:
Listen <strong><em>80</em></strong>
And replace it with this one:
Listen <strong>8080</strong>
Save changes.
Open your virtual host file:
sudo vi /etc/httpd/sites-available/example.com.conf
Find the following line:
<VirtualHost <strong><em>*:80</em></strong>>
ServerName example.com
And replace it with this one:
<VirtualHost <strong><em>127.0.0.1:8080</em></strong>>
ServerName example.com
Save changes.
Launch Varnish, start it automatically at boot and check service status
varnishd -V
sudo systemctl start varnish
sudo systemctl enable varnish
sudo systemctl status varnish
Restart Apache
sudo systemctl restart httpd
Open your website in browser to see the “Hello, World!” message, e.g.:

Step 3. Configure Apache HTTP Server As Reverse-Proxy
1. Create SSL certificate for Apache
For the purpose of this tutorial, we will create self-signed SSL certificates. Nevertheless, you can also install free let’s encrypt certificates using this online manual.
First, you have to be sure that the mod_ssl Apache module is installed on the server.
dnf install epel-release
sudo dnf install openssl mod_ssl
sudo systemctl restart httpd
Check if mod SSL is enabled:
apachectl -M | grep ssl
sudo openssl req -x509 -nodes -days 365 -newkey rsa:2048 -keyout /var/www/example.com/ssl/apache-selfsigned.key -out /var/www/example.com/ssl/apache-selfsigned.crt
2. Setting up new Apache virtual host for SSL communication
Open your virtual host file:
sudo vi /etc/httpd/sites-available/example.com.conf
Add a new proxy virtual host that will listen to 443 port and redirect all traffic to Varnish (port 80), e.g. perform SSL termination.
<VirtualHost 127.0.0.1:8080>
    ServerName example.com
    ServerAlias www.example.com
    DocumentRoot /var/www/example.com/public_html
    ErrorLog /var/www/example.com/error.log
    CustomLog /var/www/example.com/requests.log combined
</VirtualHost>


<VirtualHost *:443>
    ServerName varnishtest2.plumrocket.net
    RequestHeader set X-Forwarded-Proto "https"

    ErrorLog /var/log/httpd/external-https_error.log
    CustomLog /var/log/httpd/external-https_access.log combined

    SSLEngine On
    SSLCertificateFile /etc/ssl/certs/apache-selfsigned.crt
    SSLCertificateKeyFile /etc/ssl/certs/apache-selfsigned.key

    ProxyPreserveHost On
    ProxyPass / http://127.0.0.1:80/
    ProxyPassReverse / http://127.0.0.1:80/
</VirtualHost>
Save changes and restart Apache
sudo systemctl restart httpd
Step 4. Testing
Open your domain in the web browser to test if the Varnish Cache is working properly:
Run one of the following three commands from shell to test varnish while simultaneously refreshing the web page:
varnishlog
varnishtop
varnishstat
Enter Ctrl + C to stop the above commands from running.
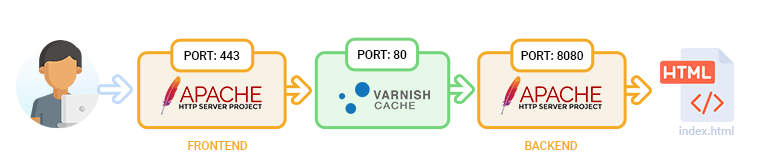
If you experience any errors, it’s always wise to test each portion of our setup separately. If you look at diagram 3 above, you will see that our setup consists of 3 logical sections – Apache frontend, Varnish, and Apache backend.
Test Apache backend to see if the virtual host is accessible from the shell:
curl http://127.0.0.1:8080/
Test Varnish Cache to see if it is accessible from the shell:
curl http://127.0.0.1:80/
Finally, test the Apache frontend from the shell:
curl https://127.0.0.1/
Summary
Varnish is useful to speed up site load time and we oftentimes suggest our clients optimize their Magento store performance. Please don’t hesitate to contact us if you need assistance speeding up your Magento store. If you find this tutorial useful, please like and share it with the world.